8. Securing BitShares with Ledger Nano
Your BitShares account can be secured by a Ledger Nano S hardware wallet. Hardware wallets secure crypto assets by protecting private keys. With a hardware-secured account, transaction signing occurs on the hardware device, rather than the host computer, isolating private keys from exposure to malware or other threats.
This tutorial explains how to create a new BitShares account and set its Active and Owner authorities to keys managed by the Ledger Nano S hardware wallet, using the BitShares App for Ledger Nano S and a companion GUI app called SimpleGUIWallet.
Contents:
8.1. Requirements
- A Ledger Nano S hardware wallet, with latest firmware.
- An existing BitShares account (optional).
- Ledger-aware wallet software, such as SimpleGUIWallet (described below), for managing your hardware-secured BitShares accounts.
8.2. Installation and Setup
This section covers installation of the BitShares app on the Ledger Nano S hardware device, and the installation of the companion GUI wallet app called SimpleGUIWallet for managing your hardware-secured BitShares accounts from a host computer running Windows, OS X, or Linux.
8.2.1. Installation of BitShares app from Ledger Live
The BitShares App for Ledger Nano can be installed on your Ledger Nano S device from a host computer via the Ledger Live device management app.
- Select the “Manager” tab from the menu in Ledger Live.
- Search for the BitShares app in the App Catalog.
- Click “Install” to install the BitShares app, following on-screen instructions
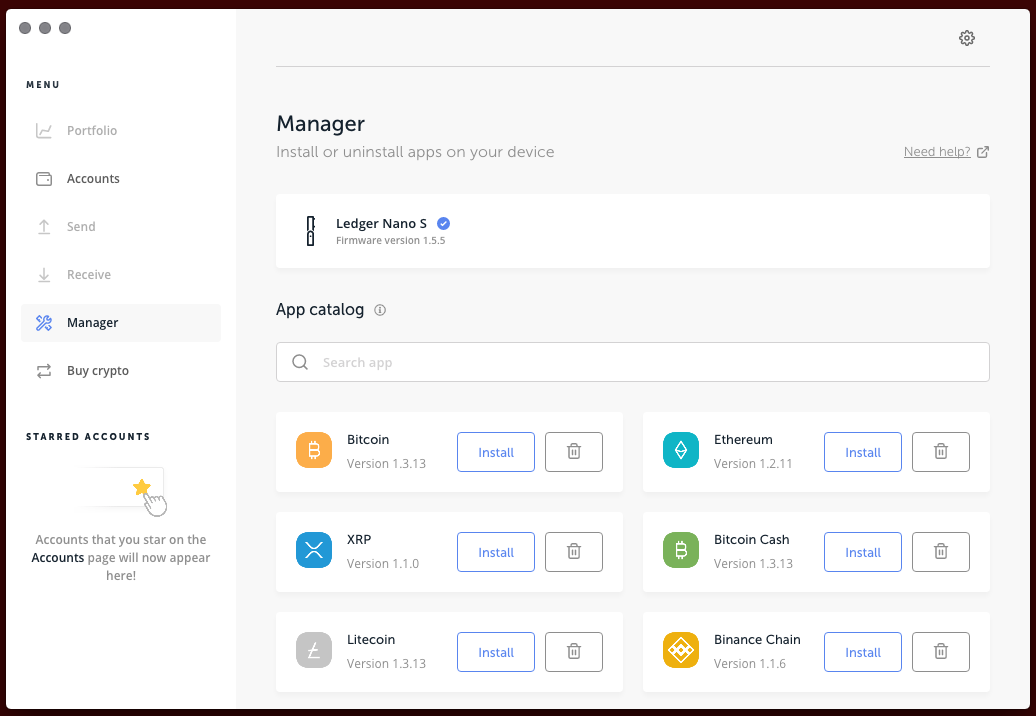
Ledger Live “Manager” tab, showing installation of BitShares app.
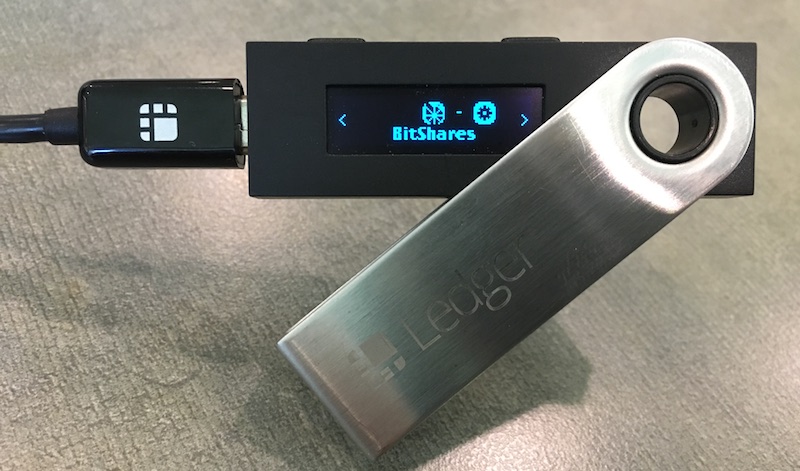
Ledger Nano S Dashboard showing BitShares app installed.
8.2.2. Installing SimpleGUIWallet companion app on host computer
A companion app, compatible with Windows, Mac, and Linux, for communicating with the the BitShares Nano app, is available from:
8.3. Securing a BitShares Account with the Ledger Nano
BitShares accounts work differently from Bitcoin wallets in that a named account must be registered on the BitShares blockchain. The account will declare one or more public keys to act as “authorities” capable of signing transactions.
BitShares accounts are very capable and flexible. The platform supports over 40 operation types. The most commonly used operations center around trading on the decentralized exchange (DEX), and of course simple transfers of tokens. The BitShares “Reference” UI wallet (web wallet: https://wallet.bitshares.org; standalone wallet: https://github.com/bitshares/bitshares-ui/releases) supports the full functionality of a BitShares account. By contrast, the Ledger Nano BitShares app is primarily geared towards simple transfers and holding of tokens, although it is technically capable of signing any operation type.
This tutorial assumes that you already have an existing BitShares account for use in a standard, full-featured BitShares UI, and that you will be creating a new, separate account, to hold tokens secured by your Ledger Nano S hardware wallet device. Essentially, we assume your existing account will be the “hot wallet,” and the new account will be your hardware-secured “cold wallet.”
8.3.1. Step 1: Create an account to associate with the Nano
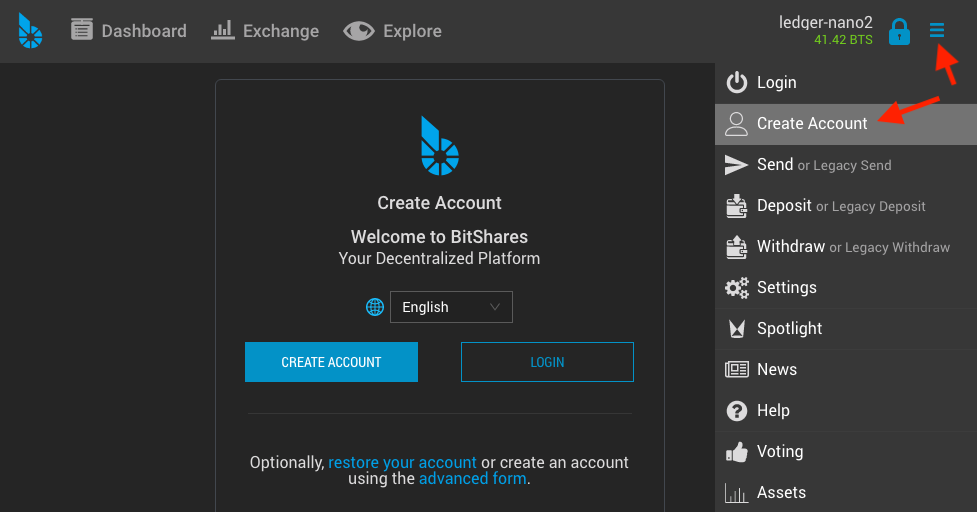
If you already have a BitShares account and it has “lifetime membership” status, you can easily create a new account by selecting “Create Account” from the main drop-down menu (“Burger” menu) in the upper-right corner of the Reference UI.
If you do not already have a BitShares account, or if your account does not have lifetime-membership status, then you can use either the standalone wallet or one of the web-hosted wallets (e.g. https://wallet.bitshares.org) to register the account, and a faucet will pay the registration fee for you. A tricky thing though is that most such wallets will only pay the registration fee for ONE account per wallet instance. So if you used the standalone wallet to register your primary account, then you may wish to use the web-hosted wallet to register your new account, or vice-versa. Or you can just load the web wallet from a different device, (or a different browser), to get back to the faucet-subsidized account registration screen.
Account Create form in the BitShares reference UI Wallet.
Once you have created this account, you will next need to retrieve two public keys from your Ledger Nano S hardware wallet, and set them as your account’s “owner” and “active” authorities. Once the original account keys are removed and replaced with these new keys, the account will be controlled solely by the Ledger Nano S hardware device.
8.3.2. Step 2: Get Public Keys from the Ledger Nano
A BitShares account specifies two types of authorities: “Owner,” and “Active,” which each declare a weighted list of public keys needed to sign transactions. (The weights allow for multi-signature arrangements. Here we will only consider a single key per authority.) For the majority of transaction types, either the “owner” authority or the “active” authority may sign the transaction. Your newly-created account will have had default keys generated for it during registration. We will replace these keys with public keys retrieved from the Ledger Nano device. We do this as follows:
- Start up the companion app, SimpleGUIWallet.
- Connect your Ledger Nano S hardware wallet device, unlock with PIN code, and start the BitShares app.
- The Nano should display the BitShares logo and the words Use wallet to view accounts.
- In the companion app, select the “Public Keys” tab from the main tab array.
- The window will show list boxes of SLIP-0048 derivation paths for three different “roles”: Owner role, Active role, and Memo role.
- (Note: SLIP-0048 is a key derivation scheme analogous to Bitcoin’s BIP-44, but tailored for the key roles used in Graphene-based blockchains such as BitShares.)
- Each path will not yet show a public key, but instead will show “(??)”.
- Click the “Query Addresses” button to retrieve the public keys corresponding to each derivation path from the Nano device.
- The list boxes will now be populated with paths and public keys.
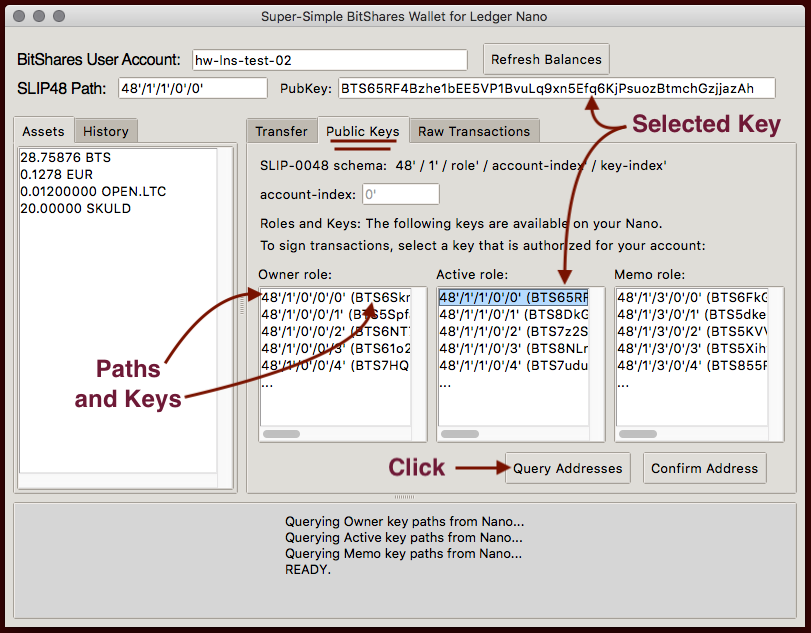
The Public Keys tab can be used to list public keys controlled by the Ledger Nano device, organized by derivation path.
- Now we wish to select one key to use for our account’s Owner role and one for the Active role. You may of course choose any key, but the recommendation is to choose the first key on the “Owner role” list (path 48’/1’/0’/0’/0’) for the owner authority and the first key from the “Active role” list (path 48’/1’/1’/0’/0’) for the active authority. When an item from the list box is selected, the public key appears in the PubKey box at the top of the window, where it can be copied to your computer’s clipboard.
8.3.3. Step 3: Confirm keys on Ledger Nano device
It is highly recommended to confirm your selected keys on the Ledger Nano device prior to importing them as authorities into your new BitShares account. This is to ensure that the SimpleGUIWallet companion app has not been tampered with to give you a decoy key. Confirm keys as follows:
- In the “Public Keys” tab of SimpleGUIWallet, query addresses as in the subsection above. Then select the key you wish to confirm from the list, and click the “Confirm Address” button.
- On your Ledger Nano device, look to see that the device says “Confirm public key” and displays the exact same public key as you see in the SimpleGUIWallet app. If the keys do not match, DO NOT trust the key from SimpleGUIWallet. If the keys do match, then you know that the Ledger Nano device can sign transactions using the key, and you may import the key into your account, as described in the next subsection.
8.3.4. Step 4: Add the keys to your new account
In the BitShares UI wallet where you created your new account, navigate to the “Permissions” area by clicking the Menu icon (upper right), selecting “Settings,” then “Accounts,” and then “View Keys” for the appropriate account, as illustrated below:
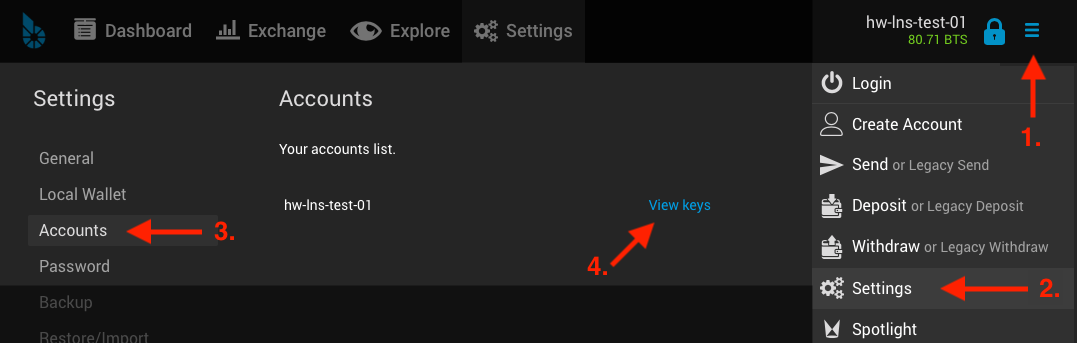
Keys are managed under Settings —> Accounts —> View Keys.
Once in the “Permissions” tab, you should see the screen below, where we will first replace the Active authority key, and then the Owner authority key.
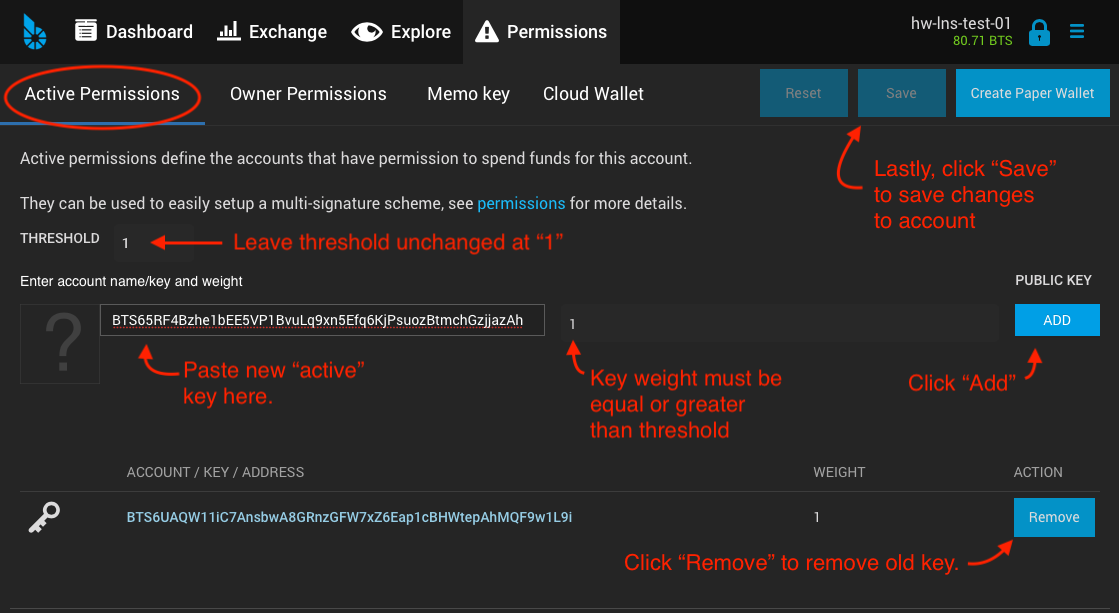
Adding a new Active key and removing the old one.
Steps:
- Select the “Active Permissions” sub-tab, (if not already selected).
- Observe the “Threshold” value. If this is a new account, registered in the standard way, this value should be “1”. Do not change it.
- In the “Enter account name/key and weight” field, paste an appropriate key copied from the “Public Keys” tab in SimpleGUIWallet. (E.g. a key from the “Active role” list, if this is for the account’s active authority.)
- For the key weight, enter “1”. (This is equal to the threshold, meaning this key can unilaterally sign transactions as the account’s active authority.)
- Click “Add” to add the key to the list of keys recognized by the account. You will now see two keys listed under “Account / Key / Addresses”. They are the new key just added, and the old key that was generated when the account was registered.
- Click the “Remove” button next to the old key. This will remove the ability of the old key to sign transactions for the account, leaving only the key derived from the Ledger Nano device to sign as the account’s active authority.
- At the top of the window, click the “Save” button to apply these changes to the account. You will be asked to confirm the “account update” transaction, and may be asked to type the password you chose when you created the account, in order to unlock the UI wallet. When the transaction is broadcast and confirmed on the blockchain, your account’s Active authority will have been successfully replaced with the new key managed by the Nano.
Once these steps are complete, repeat the above steps, but this time for the “Owner Permissions” tab, and select a Nano key from the “Owner role” list box.
When both the Active and Owner keys have been replaced, your new account can ONLY sign transactions with the aid of your Ledger Nano hardware device, and your account is now secured.
(Note: The BitShares UI wallet Permissions tab will also let you replace the Memo key. However, this is not recommended in this tutorial. Although SLIP-0048 does define a key path for memo keys, and these public keys can be retrieved from the Nano, the Ledger Nano S BitShares app does not currently support encrypting or decrypting memos with the Nano. Leaving this key unchanged means you can still use the regular BitShares UI wallet to read memos attached to transactions.)
8.4. Using the Companion app with Nano BitShares app
SimpleGUIWallet is a very bare-bones, rudimentary GUI interface to the Ledger Nano BitShares app. It does not maintain a database of keys or accounts, and will not write any data or configuration files to disk. When you start SimpleGUIWallet, you will need to tell it which BitShares account you wish to use, and which key (specified as a SLIP-0048 derivation path) to use when signing transactions.
The SimpleGUIWallet window is divided into four general areas:
- Top: This is where you type the name of a BitShares account that you wish to act as, and which key will be used to sign transactions.
- Middle Left: Here there are two tabs that show information about the selected account. After clicking “Refresh Balances,” the Assets tab will populate with a list of assets (tokens) held by the account, and the History tab will populate with a list of recent transactions conducted by the account.
- Middle Right: Here are tabs where you can “do things.” There is a tab for transferring tokens, a tab for querying the Ledger Nano to determine what keys it manages, and a tab for Raw Transactions, which can be used for advanced purposes not covered by this tutorial.
- Bottom: At the bottom is a status pane that will print messages informing you of how the app is interacting with the BitShares network and with the Ledger Nano hardware device.
When you start up SimpleGUIWallet, it will automatically connect to the BitShares network by locating a public API node to communicate with.

BitShares SimpleGUIWallet desktop companion app for Ledger Nano S BitShares app.
8.4.1. Viewing account balances
BitShares is a multi-asset platform. The core token on BitShares is the BTS token, but there are also numerous user-issued assets and assets defined by smart contracts. The Ledger Nano S BitShares app can send and receive any tokens that your BitShares account can hold.
The “Assets” tab on the left side of the window shows a list of assets held by the selected account, and their respective balances. After typing a BitShares account name in the “BitShares User Account” field at the top of the window, click the “Refresh Balances” button to refresh this list.
8.4.2. Receiving tokens
Receiving crypto assets is very easy in BitShares. Just give the sending party your BitShares account name, and they can send tokens to you. There is no need to retrieve “addresses” or keys from the wallet in order to receive funds.
8.4.3. Sending tokens
Sending tokens from your account can be done on the “Transfers” tab.
- Enter your account name in the “BitShares User Account” field.
- Optional: Click “Refresh Balances” to see asset balances for this account in the Assets tab.
- Select the “Transfer” tab.
- Fill out the “Send To”, “Amount”, and “Asset” fields.
- The “Asset” field takes a ticker symbol for the token type that you wish to send. See the “Assets” tab for a list of tokens in your account.
- Tip: Clicking an asset balance in the Assets list will auto-populate the asset symbol field on the Transfer tab.
- Connect your Ledger Nano and start the BitShares app.
- Click “Send Transfer”.
- Review transaction details on the Ledger Nano’s display screen, and approve the transaction on the device via the “check” button if the details are correct, else reject it via the “x” button.
- If you confirmed the transaction on the device, then SimpleGUIWallet will receive a signature from the Nano, append it to the transaction, and broadcast it to the BitShares network. The status pane will indicate if the transaction was successful or not.
After the transaction is broadcast, the balances in the Assets tab should update. If they do not, click “Refresh Balances” to refresh them. Likewise, the transfer operation should appear on the “History” tab, if the transaction was successful.
8.4.4. Advanced usage
If you have followed this tutorial, then your new account is now solely controlled by keys managed by your Ledger Nano S hardware wallet device. It is possible that you may at some point desire to use some of the other features of the BitShares platform, beyond simple transfers. The BitShares App for Ledger Nano S can sign any valid BitShares transaction, provided you can send it to the device for signing. The “Raw Transactions” tab in SimpleGUIWallet allows this, provided you can construct the transaction as a JSON string. How to do this is not covered by this tutorial, but the reader is directed to consult the technical documentation for BitShares or to seek the help of the BitShares community via forums or chat rooms.
8.5. Getting Support
- https://bitshares.org
- https://how.bitshares.works/ — BitShares documentation
- Ledger Nano BitShares App Issue Tracker — Submit bug reports here.
- Various Telegram groups: